Qt Quick 3D - Quick Items Example
Demonstrates the use of Qt Quick Items in Quick 3D scene.
This example demonstrates using Qt Quick 2D items in the Quick 3D scene.
Quick Items in a Quick 3D Scene
Qt Quick 2D Items, together with all their child items, can be added into Quick 3D scenes. When using Qt Quick types in the 3D scene, there are a few things to note:
- When an Item is inside a Node, its top-left corner is placed to the Node's origin. This means that the item will often want to specify
anchors.centerIn: parentto ensure the Node's origin serves the center point of the Item. - 3D transforms are inherited from the parent Node. If more than one
Itemshould be affected by the same transform, then these items can be grouped together under a common parent Item under the Node. - In Qt 6.0, items do not receive touch/mouse events e.g. with
MouseArea, so they should be non-interactive. - Quick items are not affected by lights and shadows.
- Clipping should be avoided and not relied on.
Unlike earlier Qt versions, and other 2D-in-3D embedding approaches, parenting a Qt Quick item to a Qt Quick 3D node does not imply creating a texture, rendering the 2D content to it, and then drawing a textured quad. Rather, Qt 6.0 supports rendering the 2D content within the same render pass as the 3D scene. This can present potentially huge performance improvements in practice. This does not apply when the Item were to render using an additional render target by design, for example because it has layer.enabled set to true, or because it is a ShaderEffectSource.
The test scene
The important parts of this example are the scene content of the View3D element.
We start by adding the layer furthest away from the camera. This layer contains Rectangle, Text and Image elements. To ensure that the elements in the layer are positioned correctly they are grouped together under a common parent Item. Note that all content is clipped inside this root item so it needs to be sized appropriately.
 Node {
     position: Qt.vector3d(0, 100, -120)
     Item {
         width: 400
         height: 400
         anchors.centerIn: parent
         Rectangle {
             anchors.fill: parent
             opacity: 0.4
             color: "#202020"
             radius: 10
             border.width: 2
             border.color: "#f0f0f0"
         }
         Text {
             anchors.top: parent.top
             anchors.topMargin: 10
             anchors.horizontalCenter: parent.horizontalCenter
             font.pixelSize: 20
             color: "#e0e0e0"
             style: Text.Raised
             text: qsTr("Background Item")
         }
         Image {
             anchors.centerIn: parent
             source: "Built_with_Qt_RGB_logo_vertical"
         }
     }
 }
Next Node and its items are positioned a bit closer to the camera. It contains three Rectangle items which animate both the x position and the rotation. Note that the animations are done on the parent Node while the content of the Quick Item remains static. From a performance perspective this is a good approach with more complex items.
 Node {
     position: Qt.vector3d(0, 150, 100)
     SequentialAnimation on x {
         loops: Animation.Infinite
         NumberAnimation {
             to: -200
             duration: 1500
             easing.type: Easing.InOutQuad
         }
         NumberAnimation {
             to: 200
             duration: 1500
             easing.type: Easing.InOutQuad
         }
     }
     NumberAnimation on eulerRotation.z {
         loops: Animation.Infinite
         from: 0
         to: 360
         duration: 4000
         easing.type: Easing.InOutBack
     }
     Item {
         width: 400
         height: 400
         anchors.centerIn: parent
         // This allows rendering into offscreen surface and caching it.
         layer.enabled: true
         Rectangle {
             x: 150
             y: 100
             width: 100
             height: 100
             radius: 50
             color: "#80808020"
             border.color: "black"
             border.width: 2
         }
         Rectangle {
             x: 90
             y: 200
             width: 100
             height: 100
             radius: 50
             color: "#80808020"
             border.color: "black"
             border.width: 2
         }
         Rectangle {
             x: 210
             y: 200
             width: 100
             height: 100
             radius: 50
             color: "#80808020"
             border.color: "black"
             border.width: 2
         }
     }
 }
The third item layer of this example contains a single Text item with an opacity animation. The Text item is automatically centered into the parent Node.
 Node {
     position: Qt.vector3d(0, 80, 250)
     Text {
         anchors.centerIn: parent
         width: 300
         wrapMode: Text.WordWrap
         horizontalAlignment: Text.AlignJustify
         font.pixelSize: 14
         color: "#e0e0e0"
         style: Text.Raised
         text: "Lorem ipsum dolor sit amet, consectetur adipiscing elit, sed do eiusmod " +
               "tempor incididunt ut labore et dolore magna aliqua. Ut enim ad minim " +
               "veniam, quis nostrud exercitation ullamco laboris nisi ut aliquip ex ea " +
               "commodo consequat."
         SequentialAnimation on opacity {
             loops: Animation.Infinite
             NumberAnimation {
                 to: 0
                 duration: 1500
                 easing.type: Easing.InOutQuad
             }
             NumberAnimation {
                 to: 1
                 duration: 1500
                 easing.type: Easing.InOutQuad
             }
         }
     }
 }
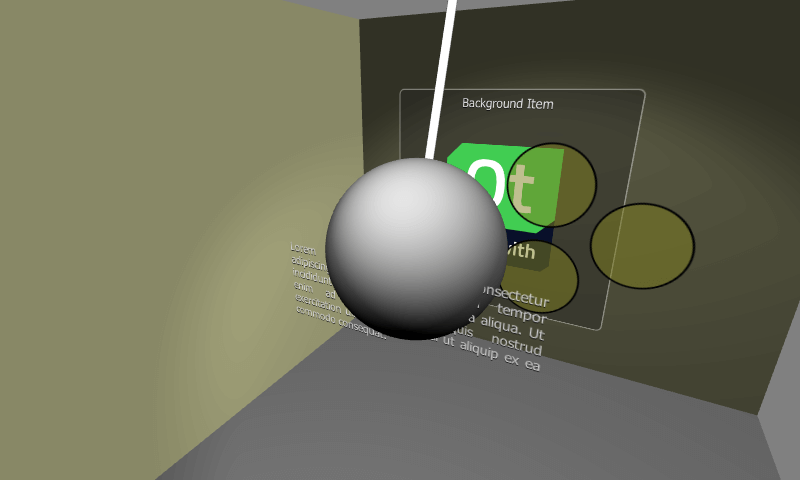
To visualize z-ordering of the above Quick Item layers, we will also setup a model for the 3D wrecking ball. It animates rotation around the top Node, which makes the sphere move through the other layers.
 Node {
     position: Qt.vector3d(0, 800, 0)
     SequentialAnimation on eulerRotation.x {
         loops: Animation.Infinite
         NumberAnimation {
             to: 20
             duration: 3500
             easing.type: Easing.InOutQuad
         }
         NumberAnimation {
             to: -20
             duration: 3500
             easing.type: Easing.InOutQuad
         }
     }
     Model {
         source: "#Cylinder"
         y: -300
         scale: Qt.vector3d(0.1, 6.1, 0.1)
         materials: DefaultMaterial {
             diffuseColor: Qt.rgba(0.9, 0.9, 0.9, 1.0)
         }
     }
     Model {
         source: "#Sphere"
         y: -700
         scale: Qt.vector3d(2, 2, 2)
         materials: DefaultMaterial {
             diffuseColor: Qt.rgba(0.4, 0.4, 0.4, 1.0)
         }
     }
 }
Files:
- quickitems/CMakeLists.txt
- quickitems/main.cpp
- quickitems/main.qml
- quickitems/qml.qrc
- quickitems/quickitems.pro
Images:
See also Qt Quick 3D Scenes with 2D Content.